Skip to content
Test Store

Test Store

  • Blog
  • About Us
  • Solution
    • Apparel & fashion
    • Home & Garden
    • Beauty & Personal Care
    • Food and Beverage
  • Help Center

Getting Started

5
  • Template Library
  • Creating Biz
  • Module Introduction
  • Explain the service package
  • Biz API

Live Chat

20
  • FollowUp
  • Chat Session
  • Bot
  • Overview
  • Merged Channel
  • Conversation filter
  • Tags
  • Message Templates
  • Internal Messages
  • Meta Conversion API
  • Add new channel
    • Telegram
    • WhatsApp
    • Tiktok User
    • Line
    • Website
    • Instagram
    • Facebook
  • Conversation Role
    • Manual splitting
    • Automatic allocating
    • Configure roles

Bot-Auto

138
  • Introduction to Bot Automation
  • Blocks
  • Sequences
  • Broadcast Sending
  • Advance Filters
  • Funtions
  • Trigger List
    • View List of Triggers
    • Facebook
      • Messenger Welcome Message
      • GenAI
      • Messenger Shopping
      • LiveChat Tags
      • Bot API
      • Click To Message
      • Messenger Persistent Menu
      • Comment
      • Keywords
      • Messenger Ref Link
      • Messenger Default
      • Messenger Welcome
    • LINE
      • Trigger Tag
      • Bot API
      • Group GenAI
      • GenAI
      • Group Keywords
      • Keywords
      • Line Group Default
      • Line Default
      • Line Group Welcome
      • Line Welcome
    • Tiktok User
      • Trigger Tag
      • Bot API
      • GenAI
      • Keywords
      • Tiktok User Default
      • Tiktok User Welcome
    • Instagram
      • GenAI
      • LiveChat Tags
      • Bot API
      • Instagram Persistent Menu
      • Comment
      • Keywords
      • Instagram Ref Link
      • Instagram Default
      • Instagram Welcome
    • Telegram
      • LiveChat Tags
      • Bot API
      • Gen AI
      • Keywords
      • Telegram Welcome
      • Telegram Default
    • Website
      • Trigger Tag
      • Bot API
      • GenAI
      • Keywords
      • Website Default
      • Website Welcome
  • Functional Card
    • LINE
      • Line Template
      • Line Quick Reply
      • Line User Input
      • Line Image
      • Line Text
    • Facebook
      • Messenger Shopify Order Details
      • Add Album
      • Messenger Template
      • Messenger Receipt
      • Messenger Product
      • Messenger CAPI
      • Messenger Handover
      • Messenger Marketing Message
      • Messenger Attach File
      • Messenger Audio
      • Messenger Video
      • Messenger Feedback
      • Messenger Media
      • Facebook Audience
      • Facebook Comment
      • Messenger Block/Unblock
      • Messenger Shipping
      • Messenger User Input
      • Messenger Typing
      • Messenger Gallery
      • Messenger Quick Reply
      • Messenger Image
      • Messenger Text
    • WhatsApp
      • WhatsApp Document
      • WhatsApp Template
      • WhatsApp User Input
      • WhatsApp Audio
      • WhatsApp Video
      • WhatsApp Image
      • WhatsApp Interactive
      • WhatsApp Text
    • Instagram
      • Instagram Shopify Order Details
      • Instagram Audio
      • Instagram User Input
      • Instagram Video
      • Instagram Gallery
      • Instagram Image
      • Instagram Text
    • Website
      • Website Text
      • Website Image
      • Website Gallery
      • Website User Input
      • Website Quick Reply
    • Tiktok Shop
      • Tiktok Shop Image
      • Tiktok Shop Text
    • TiktokUser
      • TiktokUser User Input
      • TiktokUser Text
    • Advanced Cards
      • Shopify
      • Change Tags
      • Custom Image
      • Open Gift / Add Turn Number
      • Find Customer
      • Thread Note
      • Assign to Staff
      • GenAI
      • Note
      • Follow Up
      • Thread Status
      • On/Off Bot
      • Go To Block
      • JsonAPI
      • Delay
      • Sequence
      • Set Attributes
      • Parse Content
      • Google Sheet
      • Send QR
      • Send Email
      • Check Time Range
      • Time Calculator
      • Send Block
      • A/B Testing
      • Input/Output
      • Table Data
      • Lucky Wheel/ Add Turn Number
    • Telegram
      • Telegram Image
      • Telegram Text

Customers

5
  • Customer Profile Panel
  • Export
  • Import
  • Segments
  • Customer Search

Settings

25
  • Edit Your Business
  • Channels
  • Members
  • Webview Domains
  • Attributes
  • Tags
  • Message Templates
  • API
  • Packages
  • Logs
  • Integration
    • Internal form
    • DeepSeek
    • XAI (Grok 3)
    • Claude
    • Gemini
    • Google Sheet
    • SMTP
    • Embedded Form
    • Groq
    • OpenAI
    • Shopify
      • Connect to Product Management Module
      • Connect to Order Management Module
      • Connect to Chatbot
      • Use Shopify in Live Chat Module
      • Intergrate Shopify

Extend Modules

49
  • Messenger Templates
  • Selling Page
  • WhatsApp Template
  • Quizzes
  • Order Management
  • Meta Catalogs
  • Marketing Messages
  • Meta CAPI
  • Products
  • Meta Custom Audience
  • Email Builder
    • Activate Email Builder
    • Connecting and Using Email Builder
    • Edit Email Interface
  • Customize Image
    • Activate Customize Image
    • Create Personalized Image
    • Layer Configuration
  • Follow Up
    • Follow Up Using GenAI
    • Follow Up Content
    • Activate Follow Up
    • Connecting to Chatbot
    • Follow Up Settings
  • Gift Opening Game
    • Activate Gift Opening Game
    • Connecting to Chatbot
    • Content Configuration
    • Edit Gift
    • Open Gift Design
    • Notification Configuration
  • Lucky Wheel
    • Activate Lucky Wheel
    • Connecting to Chatbot
    • Content Configuration
    • Edit Prizes
    • Spinner Design
    • Spinner Configuration
  • Form Builder
    • Activate Form Builder
    • Connecting to Chatbot
    • Form Configuration
    • Element Configuration
  • Data Table
    • Data Table Use Cases
    • Data Table Setup
  • GenAI
    • Demo and Review
    • Config
    • Prompts
    • Create GenAI Agents
    • AI Agent Types
      • Translate
      • Post Content
      • Quiz Maker
      • Conversation Note
      • Message Content
      • AI Chatbot

Statistic

5
  • Interactive
  • Tags
  • Marketer
  • Supporter
  • Customers
View Categories
  • Home
  • Help Center
  • Settings
  • Members

Members

Est reading time: 1 min read

The Member Settings allow you to create roles and assign permissions for employees within your business.

1. Create Role #

Step 1: In the Member Settings, select the Roles tab, then choose Add Role.

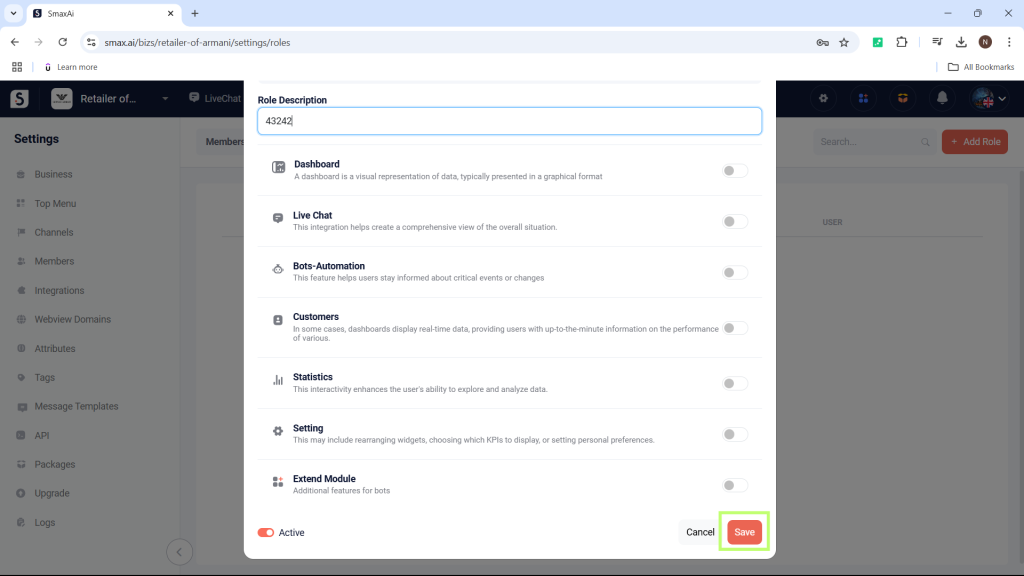
Step 2: Enter the role name (required) and role description (optional), then enable the modules and features you want to add for that role.

List of modules and permissions in the modules:

Dashboard: Updating

Live Chat

PermissionDescription
LEADERHas the authority to view all conversations, assign conversations to support staff (in split conversation mode), configure tags, quick reply templates, etc., in the LiveChat module.
MAIN SUPPORTResponsible for the main conversation assigned, counted in KPI from the conversation.
ASSISTANT SUPPORTAssists when the MAIN SUPPORT staff cannot respond to the conversation; does not count in KPI.

When using the split conversation feature, you need to configure all three roles for employees to use the feature effectively.

Bot-Automation

PermissionDescription
Setup BotHas the authority to view and edit scenarios in the module.
Preview BotOnly has the authority to view scenarios, no editing rights.

Customers: Permission to view, edit, import, and export customers from channels.

Statistics: Permission to view reports on customers, messages, interaction levels, etc.

Settings

PermissionDescription
BusinessPermission to edit business information and general configurations for the business.
ChannelsPermission to edit the business’s channel connections.
MembersPermission to manage and assign roles to employees in the business.
IntegrationsPermission to manage and edit connections with other platforms.
Webview DomainsPermission to add domains to the business.
AttributesPermission to edit attributes in the business.
Block TemplatesPermission to add quick block send templates in the LiveChat module.
TagsPermission to add tags in the LiveChat module.
Message TemplatesPermission to add message templates in the LiveChat module.
APIPermission to manage API tokens.
PackagesPermission to manage and upgrade subscription packages.
UpgradesUpdating

Logs: Permission to view the activity history of the Bot – Automation system.

Then select Save to create the new role.

2. Edit Role #

To edit a role (add or remove permissions), select the edit icon next to the role.

After making the edits, select Save to apply the changes.

3. Add Employee #

To add an employee to the business, the employee must log in to SmaxAi.

Step 1: Go to the Personal Profile section and copy the email of the employee you want to add to the business.

Step 2: In the Member Settings, select Add Member.

Then enter the email of the employee you want to add, select a role for the employee, and click Save.

You can edit the permissions for an employee by selecting the ROLE column and choosing the desired role to change.

Updated on 02/08/2025

What are your Feelings

  • Happy
  • Normal
  • Sad

Share This Article :

  • Facebook
  • X
  • LinkedIn
  • Pinterest
ChannelsWebview Domains

Leave a Comment Cancel reply

Table of Contents
  • 1. Create Role
  • 2. Edit Role
  • 3. Add Employee
© 2026 Test Store • Built with GeneratePress