

Chatbots have revolutionized customer service and marketing, making them an essential tool for businesses looking to enhance engagement, automate interactions, and improve efficiency. If you’re considering implementing a chatbot in Facebook Messenger, this guide will walk you through the entire process – from understanding the benefits to setting up a fully functional chatbot using Smax AI.
What Is a Facebook Messenger Chatbot?
Facebook Messenger Chatbot is a virtual assistant that interacts with users on Facebook Messenger. These bots simulate human-like conversations using Natural Language Processing (NLP) and Artificial Intelligence (AI), enabling businesses to provide instant responses, automate sales processes, and gather customer insights.
Types of Messenger Chatbots
- Rule-Based Chatbots: Operate using pre-defined scripts and decision trees to respond to user queries.
- AI-Powered Chatbots: Utilize machine learning and NLP to offer dynamic, context-aware responses that improve over time.
What Are the Business Benefits of Building a Messenger Chatbot?
Implementing a chatbot in Facebook Messenger can lead to tangible benefits, making it a strategic investment for businesses of all sizes. Here’s why:

24/7 Customer Support Across Multiple Channels
- Instantaneous Responses: Chatbots eliminate wait times and improve the user experience.
- Always Available: Provide seamless customer support even outside business hours without requiring additional staff.
Cost Reduction and Scalability
- Lower Staffing Costs: Automation reduces the need for extensive human support teams, cutting down operational expenses.
- Efficient Scaling: Unlike human agents, chatbots can handle thousands of conversations at once, ensuring your business can grow without proportionally increasing support costs.
Increased Customer Engagement and Revenue Generation
- Lead Nurturing: Chatbots can follow up with prospects, guide them through the sales funnel, and even recover abandoned carts.
- Cross-Selling & Upselling: AI chatbots analyze user behavior to suggest relevant products, enhancing average order value.
Data Collection and Insights
- Gather valuable customer data to optimize marketing strategies, personalize experiences, and refine product offerings.
How To Set Up a Chatbot in Facebook Messenger with Smax AI in 7 Simple Steps (2025 Updated)
Creating a chatbot in Messenger might sound complex, but with Smax AI, it’s straightforward and beginner-friendly. Follow these 07 detailed steps to build a fully functional bot tailored to your business needs.
Prepare Your Chatbot Script
Start by drafting your chatbot script using tools like Word, Excel, or even mind-mapping platforms such as Miro, Whimsical, or Canva Whiteboard. Keep it simple – a basic sketch or flowchart will help you visualize the conversation flow.

💡 Pro Tip: Put yourself in your customer’s shoes. What information would you want to receive? Build a script that meets your needs and those of your audience.
Example Script Breakdown:
- Block 1: Welcome message with a “View Products” button.
- Block 2: Display product images and a “Buy Now” option.
- Block 3: Request customer’s information for the order.
- Block 4: Send a thank you message to confirm the order.
Guide to Building a Basic Facebook Messenger Chatbot Script (Updated for 2025)
Here’s a detailed walkthrough to create a simple Facebook Messenger chatbot script for welcoming customers and offering product advice.
Step 1: Connect to Your Fanpage
Link your Facebook Fan Page to Smax AI to enable Messenger integration.
Step 2: Get Familiar with the Bot-Auto Interface
This is where you’ll build and organize your chatbot’s conversation blocks.
Navigate to: Bot-Auto > Blocks > Create and Name Group Child “Welcome” > Create and Name Block “Welcome”.

Step 3: Create a Welcome Message to Kick Off the Conversation
First, users open the “Welcome” block for editing.
- Drop the Messenger Text card into the dashboard.
- Write a friendly greeting, e.g., Welcome, Mr. Chris, to Smax AI. How can I assist you today?
To personalize the message as in the example above, you need to input functions starting with square brackets “[..]” or curly braces “{…}”.

Examples:
- For Gender → Enter the character [ and select the option [=GENDER(Miss, Mr)]
- For Customer Name → Enter the character { and select the option facebook.name
- For Fanpage Name → Enter the character { and select the option facebook.page.name
Users can create button content based on their goals. Smax AI suggests the following basic buttons: View Products, Call Hotline, Visit Website.
Step 4: Create a Product Listing Message for Customers to Browse Products
In the current Messenger Text card of the “Welcome” block.
- Select Add button.
- Name the button “View Products” > In the Block section, choose Create New Block > Name the new block “View Products”
Then, users open the “View Products” block for editing.
- Drop the Messenger Text card and a Messenger Gallery card.
- Upload product images; Set product name, code & price.

In the Product block, select New Button > Name the button “Buy Now” > Create block “Request Info” > Select attribute and add new attribute.

Step 5: Create a Request Info and Order Confirmation Message
Users open the “Request Customer Info” block for editing.
- Drop the Messenger Text card into the dashboard.
- Enter the customer info request message, e.g., “If you’re ready to order Plain black babytee, which is $10, just need a little info from you to get that sorted.”
- To include confirmation of Product Name and Price in the message, enter the character { and select the attributes “product_name” and “product_price”.

Then, to create automatic questions to collect data:
- Drop the Messenger User Input card.
- Enter the message.
- Create attributes corresponding to each piece of customer information.
Examples:
- Question about customer’s full name → Attribute: full_name
- Question about customer’s phone number → Attribute: phone_number

Next, to confirm customer’s order info:
- Drop the Messenger Text card
- Enter the message content
- For each piece of information, the user will select the corresponding attribute
- Create a Confirm button > Create an Order Confirmation block.

Note: When the customer confirms that the details are correct, the ‘Confirm’ button directs them to the ‘Order Confirmation’ block. If there are any mistakes in the customer’s information, the ‘Edit’ button automatically restarts the chatbot at the ‘Request Customer Info’ block.

This is a complete order confirmation message.

Step 6: Finalize with a Thank-You and Data Export
Thank-You Message
- Open the Order Confirmation block for editing.
- Drop the Messenger Text card.
- Enter the Thank You message content.

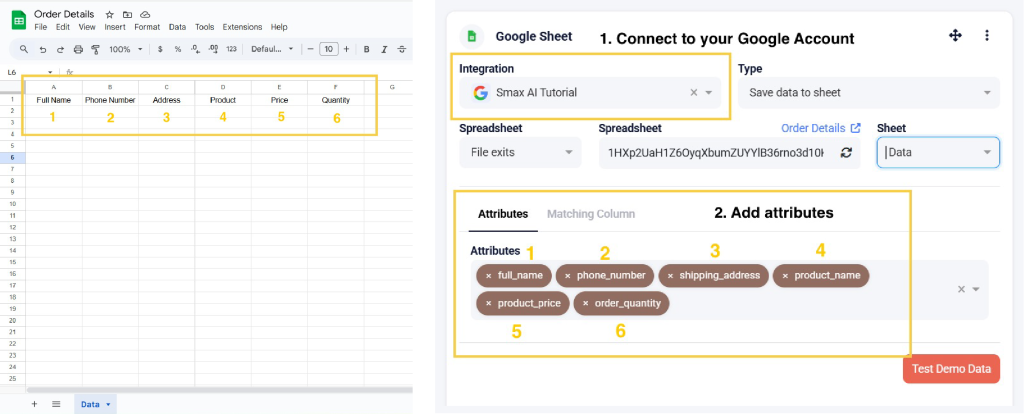
To export the customer’s order to Google Sheets
- Drop the Google Sheet card into the dashboard
- Connect to a Google account and ink the pre-created Sheet with column names as shown in the image.
Note: In the Attributes section, select the attribute names in the order corresponding to the content of the columns in the Sheet.
Step 7: Attach Your Script to a Welcome Trigger
After creating the script, you need to connect the script to a Trigger to activate it when a customer messages the page. Here’s how to do it:
- Select Trigger from the left toolbar.
- Choose Messenger Welcome.
- Turn on the “Get Started” button and Link it to the “Welcome” block.
- Save to activate your chatbot when users message your page.

Ready to launch? Hit that “Save” button to lock in your chatbot’s initial setup!
But don’t stop there – the real magic happens during testing. Put yourself in your audience’s shoes and start a conversation with your chatbot directly on your Fanpage. See the result here!
Final Thoughts: The Competitive Edge of Facebook Messenger Chatbot in 2025
Facebook Messenger chatbots are no longer a futuristic concept – they are a present-day necessity. By implementing a chatbot using Smax AI, businesses can streamline operations, enhance customer interactions, and drive revenue growth.
A well-designed chatbot can:
- Turn casual visitors into loyal customers.
- Automate sales and support processes.
- Collect valuable data to refine marketing strategies.
Don’t wait for your competitors to adopt chatbot technology before you do. Start building your Messenger Chatbot today with Smax AI, and unlock new opportunities for growth in 2025 and beyond!